Saturday, December 31, 2011

Finishing up the Side Hall

I've spent the last few weeks working on the house. The side hall was the first project I worked on.

Back in October of last year I laid the new oak flooring in the side hall but I never finished the last row.


It only took about an hour to install the final row of flooring, but last year I spent two sixteen hour days on it and by the time I got to the last row, which I had to rip down to the right size, I was just too tired to finish.


With the floor finally finished I turned to the chair rail. I was originally going to have some made for me but once I looked closely at the profile I realized that I had a router bit that could do it in two passes.


It's an almost perfect match to the original. Next I finished the sheetrock above the chair rail.


The trim that makes the bottom part of the chair rail will have to be made, I cant do it and there is nothing even close at the store.


Here are a few pics of the side hall now.


Left to do still is the trim for the bottom of the chair rail, picture rail, and crown. Oh, and replicate a leg for the Empire dresser...

Thursday, December 1, 2011

Finishing the Main Bathroom walls

The other project I worked on during my week off was getting the walls done in the main bathroom.


This has been like this since '09. I finished hanging the sheetrock then taped and mudded the walls.


Then I put up a coat of primer.


I liked the sink vanity I had on this room, it was an old oak dresser that I converted into a vanity, but my wife really wanted another one I made in here instead.


This is the very first piece of furniture I ever made. I made it back in '05. It was an old desk originally, I built the doors and the mirror onto it. The spindles are from the footboard of my wife's grandmothers bed. (The footboard was all that was left of it.)


I also installed the chandelier.


It is solid brass including the candle covers.

I still have to install 1/4 round on the ceiling, Wire up the outlet, caulk, cut in the primer, paint, and strip and paint the door.

Monday, November 28, 2011

Dining Room

I took Thanksgiving week off to finish up some projects around the house.

The Dining Room was what I really wanted to get done the most. It has been half done since I moved the wall to make more room in the kitchen almost three years ago.

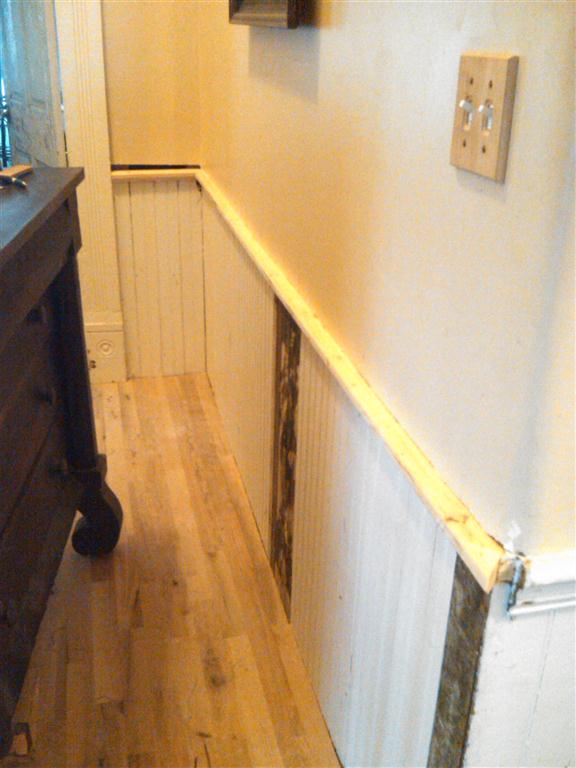
Here is what it looked like at the beginning of last week.


First I moved everything but the furniture out of the room, then I moved the furniture to the center of the room.

Next I scrapped the peeling walls above the picture rail. Once it was all scraped I mudded above the picture rail completely around the room.

With that done I worked on the door casings for the exterior door and the door that leads to the hallway.

The casings on the door that lead to the hallway had separated and were loose. I removed them and reinstalled them properly.


Next I worked on the door casings for the exterior door. You may remember in previous posts that the original doorway was closed off in the past and I reverted it back to a doorway.

First I finished mudding the area.


Next I began working on the casing and rosettes. the only two rosettes I had left were both split in half. I used my doweling jig and glued them back together with dowels.


Once they were dry I installed them above the door along with the casing.


Next I installed the picture rail on the wall that I rebuilt.


With that done I was ready for paint. I went around the room and glued down any loose wallpaper.

I really hated to paint over the wallpaper but there were just too many places where the paper was in too bad a shape.

First I primered and painted the trim.


Then I primered and painted the walls. It turned out that there was something wrong with the paint I chose, it was way lighter than the paint sample at the store. I didn't have a choice though and had to use it. I painted on Thanksgiving morning so we had to hurry and get the furniture back together for Thanksgiving dinner so I didnt get any pictures until after the dinner.


I also had to do some last minute electrical to get an outlet in for the china cabinet light.

I still have a lot of wainscoting to caulk and paint, I need to have some casing replicated for the door to the kitchen, and the ceiling needs to be primered and painted.

Wednesday, October 12, 2011

Dining Room Door part 2

A year ago to the day I rebuilt the dining room door. You may remember that this door was rebuilt as a window at one point and then closed in altogether.

I rebuilt it as a door as it was originally and installed an old french door that I had on hand.


As you can see it was missing many panes of glass and was in terrible shape. I installed a door knob and replaced all the broken panes except two that were only cracked but that was it.Not long after installing the door it started separating on the hinge side at the dowels so we stopped using it. It sat that way for a year.


Since the weather has been so nice lately I figured this was a perfect time to fix the door.

I removed the door and pulled it apart, then glued and clamped the door back together. Once it was dry I filled all the holes with wood putty, then sanded the entire door down.

Then I primered and painted it and reinstalled the door.


As you can see I need to finish the inside door casing.

The door works great now. I will be getting a screen door for it very soon. I will add brackets to the screen door like I did on the screen porch a while back.

Wednesday, September 7, 2011

Baby Gate II

Over the weekend I built the upstairs baby gate. You may remember earlier when I built the baby gate for the bottom of the stairs.

I built this one a few inches shorter to match the railings upstairs. I used the same walnut balusters that I used for the downstairs gate and poplar for the frame again.

Here is a picture of it ready for primer.


Once it was primered and painted I made another handrail out of heart pine.

Here is a picture of the railing after the rough cuts were made.


I dont have a round-over router bit of the correct size so I'm having to make the cuts on my table saw then round them over with a sander. After this picture was taken I used a dado blade on my table saw to make the recessed cut on the bottom of the railing so it will fit over the top of the gate, sorry I didnt get a picture of that.

Once the railing was sanded I used Red Chestnut stain from Minwax to get the correct tone to the wood then put on a coat of poly.

Once it dried I installed the railing then put up the gate.

Here are a few pics.


As you can see from the pictures I still have a lot of work to do upstairs. The railings and the balls on top of the newels will be stripped and stained, everything else will be repainted.

Thursday, August 25, 2011

Stump Removal

The stump removal company came out last Saturday and removed the stump.


It only took about 40 minutes to grind it to mulch. I used some of the mulch for the beds in my front yard as oak mulch is great for retaining water.

Before the stump was ground down I counted the rings on it several times and got an average of 109 (it's very hard to count the rings as they are very close together and very faint). So the tree was probably planted sometime around 1902. I know the house was built sometime between 1895 and 1902 so the trees were either original to the house or planted not long after it was built.

Thursday, July 28, 2011

Oak Tree Removal

There are two very large Oak trees in front of our house. I'm pretty sure they are as old as the house. There used to be three but one was hit by lightning years ago and came down. I removed the stump from that one last year with the help of a friend and his back hoe. The root ball was over 6 feet in diameter and lifted the front wheels of the tractor 4 feet off the ground when we picked it up with the back hoe arm.

The next tree over (the one that would have originally been in the middle of the three)  was starting to look really bad, there is a large rot hole at the top of the trunk where a large limb had fallen off many years ago. It's been getting steadily larger over time.


I've become increasingly concerned that the tree will come down on the house in a storm so I spoke with the city about taking it down as it's in the right-of-way on their property. The city council voted to have an arborist come out and make an assessment of the tree and go ahead and take it down if that's what the arborist recommended.

The arborist came out and immediately recommended that the tree come down. The city got the tree removal service out a few days later.


Look at that trunk, almost all heart. Too bad I dont have a sawmill handy.


They had to cut the trunk in half because it was too heavy for their crane to pick up.


I hate to see the tree go but it was becoming too much of a danger to the house and us.

Monday, July 25, 2011

Dining Room Wall sheetrock complete

I finally completed the sheetrock and mudding on the Dining Room wall.


I'll be pretty busy at work this week but hopefully I can squeeze in some time to get the picture rail hung and then primer the wall. It will probably be this weekend before I can scrape, primer, and paint the entire room.