The fence is coming along nicely.
I'm hoping to have the yard completely enclosed in another day or two.
Wednesday, August 26, 2009
Tuesday, August 25, 2009
More fence work
I was back at work on the fence yesterday afternoon. I didnt get near as much done as I'd hoped.
I worked mainly on the back fence line.
I added the stringers to all the posts and put up about 2 1/2 panels of dog-ears.
The picture above is of the gateway at the side of the house. I finished up the small section next to the house. Hopefully today I can build and install this gate.
I worked mainly on the back fence line.
I added the stringers to all the posts and put up about 2 1/2 panels of dog-ears.
The picture above is of the gateway at the side of the house. I finished up the small section next to the house. Hopefully today I can build and install this gate.
Monday, August 24, 2009
Back to the fence
This past weekend I got back to work on the fence. I've been working on the section in the back yard. This area is very overgrown and took quite a bit of time to clear out.
The above picture is the far back property line, our barn is about 6" over the line so I have to build the fence into the side of the barn to keep it inside the property line.
This one is the back right property line looking back. The line breaks right at the oak 40' before turning and going up to the street.
Here is the back property line with the posts in the ground, I'm digging all the holes by hand with a post hole digger so it's slow going.
The last two images above are the posts on the right property line. hopefully today I can get the cross braces up and start on the dog-ear pickets.
Wednesday, August 12, 2009
Laundry Room
I stopped working on the fence for a little bit to work on the Laundry room. I had to do this because we were quickly running out of clothes.
The first thing I did was run all the wiring in the floor that needed to be run, this includes the wiring for the overhead lights in the Dining room, kitchen, and bathroom below. With that done I laid R-30 insulation down and installed the sub-floor over it.
Here is part of the sub-floor going down:
Next I built the knee-wall where the washer/dryer will go.
I also installed the sub-panel, this will feed the upstairs rooms.
Here's a question for you Electricians out there, is this sub-panel wired correctly? The main panel is wired with a neutral ground so I added a wire between neutral and ground in this panel.
Next I hung the sheet-rock in the washer/dryer area. installed the dryer plug and vent hole after this picture.
Then I set up the washer and dryer.
This is all I'm going to do on this for now, we have a working washer and dryer and there are more pressing things to do... like maybe getting some electricity to the upstairs bedrooms. We're using flashlights to get around upstairs at night right now.
Labels:
appliances,
attic,
Electrical,
flooring,
insulation,
Laundry room,
Plaster/Drywall,
plumbing
Tuesday, August 4, 2009
Fence pt. 2
Work continues on the privacy fence.
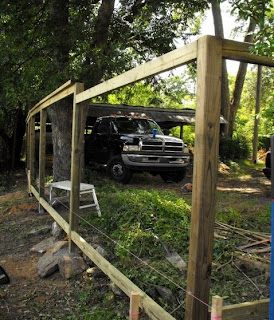
The section of fence in the picture below runs along the carport. It's a tight squeeze between the carport and a large Pecan tree. The tree is directly on the property line.
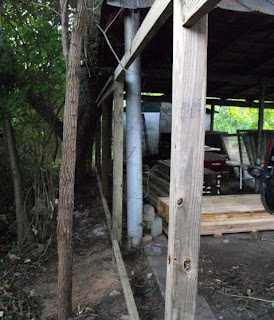
As you can see I had to get creative with the fence here, I'm hoping that the tree is just about done growing...
The section of fence in the picture below runs along the carport. It's a tight squeeze between the carport and a large Pecan tree. The tree is directly on the property line.
As you can see I had to get creative with the fence here, I'm hoping that the tree is just about done growing...
Monday, August 3, 2009
Building the privacy fence
Wow, it's been another month since I posted anything again. Sorry about that, things have been really hectic here lately. I've been working on a number of projects. I'll post more about them later, for now I'll post about building our fence, it's what we've been working on for the last week or so.
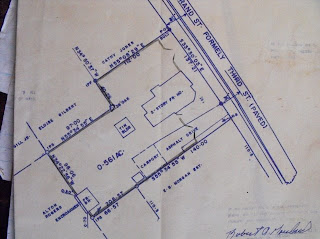
The fence will be a total of 506 feet long. Here is a picture of the plat with my fence drawn in pencil:
Most of the property line was full of dense, overgrown vegetation. I have cut a line around most of it. To do this I had to find the property corners first, this is not easy without the proper tools, especially on a very old property like this. I used to be a Land Surveyor though so I had that on my side and I was finally able to locate them.
The first part of the fence I built was along the left side of the house (when facing it).
The next day I started on the right property line.
As you can see in the above picture I had to build this part of the fence in an arc, it follows an old granite and concrete wall. The property line is just to the left edge of the fence.
That was as far as I got yesterday before the rains came.
The fence will be a total of 506 feet long. Here is a picture of the plat with my fence drawn in pencil:
Most of the property line was full of dense, overgrown vegetation. I have cut a line around most of it. To do this I had to find the property corners first, this is not easy without the proper tools, especially on a very old property like this. I used to be a Land Surveyor though so I had that on my side and I was finally able to locate them.
The first part of the fence I built was along the left side of the house (when facing it).
The next day I started on the right property line.
As you can see in the above picture I had to build this part of the fence in an arc, it follows an old granite and concrete wall. The property line is just to the left edge of the fence.
That was as far as I got yesterday before the rains came.
Subscribe to:
Posts (Atom)