

Sunday, September 13, 2009

Saturday, September 12, 2009
Toilet Seat
Yesterday I Refinished the antique toilet seat for the main bathroom. I got the seat with an antique toilet a few years ago for $10. The toilet will eventually go in the upstairs bathroom but I need the seat for the main bathroom.
It had sat outside for years so it was in very rough shape. It had literally come apart at the seams. The lid had only come apart in two places but the seat was in like 20 pieces. I sanded the seams down and glued and clamped it back together, I did that part last year but I didn't get any pictures of it though, sorry.
Here is what it looked like yesterday before I refinished it:

I removed the hardware and let it soak in some TSP. Then I sanded the lid and seat down and then gave it about 5 coats of amber tinted shellac.
Once that was done I scrubbed the hardware down and put it all back together.
Here's a picture of it on the toilet:

It's going to need a few more coats of shellac to match up with the tank better but for now it's ok.
Of course I was also working on the scraping and painting of the house yesterday. This was how far I got:

Finally! That horrible peach color is almost gone!
It had sat outside for years so it was in very rough shape. It had literally come apart at the seams. The lid had only come apart in two places but the seat was in like 20 pieces. I sanded the seams down and glued and clamped it back together, I did that part last year but I didn't get any pictures of it though, sorry.
Here is what it looked like yesterday before I refinished it:

I removed the hardware and let it soak in some TSP. Then I sanded the lid and seat down and then gave it about 5 coats of amber tinted shellac.
Once that was done I scrubbed the hardware down and put it all back together.
Here's a picture of it on the toilet:

It's going to need a few more coats of shellac to match up with the tank better but for now it's ok.
Of course I was also working on the scraping and painting of the house yesterday. This was how far I got:

Finally! That horrible peach color is almost gone!
Friday, September 11, 2009
Scraping paint sucks!
Here's what I accomplished yesterday:
 It doesn't look like a lot but the area I'm working on now has a lot more loose paint than the area I did the day before. The lower half of the second floor appears to have had primer put on over the old paint sometime in the past. You can see it in the above picture to the left of the window. Because of this the old paint is sticking in large chunks and is very hard to scrape off.
Once I get above this line it should go a lot quicker, the old paint is barely hanging on there and should come right off.
The other thing I accomplished yesterday was to install one of our porch lights, we have two of them. The other one will go on the other side of the window.

 It doesn't look like a lot but the area I'm working on now has a lot more loose paint than the area I did the day before. The lower half of the second floor appears to have had primer put on over the old paint sometime in the past. You can see it in the above picture to the left of the window. Because of this the old paint is sticking in large chunks and is very hard to scrape off.
Once I get above this line it should go a lot quicker, the old paint is barely hanging on there and should come right off.
The other thing I accomplished yesterday was to install one of our porch lights, we have two of them. The other one will go on the other side of the window.

Thursday, September 10, 2009
Primer
Well I've finally decided to start primering the house. I cant paint the house until I've rebuilt the front porch but at least I can primer it so it doesn't look so bad.
So far I've gotten most of the first floor front done:


In the first picture you can just see another project I recently finished, the mailbox:

I used a cedar post and then put on a coat of amber shellac. The numbers are oil-rubbed bronze.
I've also been working on the electrical in the house. I've gotten the upstairs hallway light wired up and also our bedroom ceiling fan:


Today I'll be back at work one the primering...
So far I've gotten most of the first floor front done:


In the first picture you can just see another project I recently finished, the mailbox:

I used a cedar post and then put on a coat of amber shellac. The numbers are oil-rubbed bronze.
I've also been working on the electrical in the house. I've gotten the upstairs hallway light wired up and also our bedroom ceiling fan:


Today I'll be back at work one the primering...
Tuesday, September 8, 2009
Finishing up the fence... for now
I finally finished the fence this weekend. I still have more fence to put up but I have the back yard completely closed in so our dogs can go outside and run when they want to now.
Here is a picture of the Plat with the fence drawn in:

The green lines are the sections of fence that are complete, the blue lines near the back of the house is a smaller 4' fence I built to section off the side yard from the rest of the yard. The red lines are the sections of fence that I haven't done yet.
The final section that needed to be completed since the last post was the smaller 4' fence. This fence surrounds an old brick patio that I discovered.
First I put in the posts:


To do this I had to cut the boxwood bushes way back, as I cut the bushes back I discovered a brick walkway between them that leads out to the side yard. I had planned on putting a small gate in the middle of the fence but I moved the location to the edge to line up with the walkway.
By the way, the brick patio is under all the weeds. leaves, and dirt in the pictures, I haven't finished uncovering them yet. The patio appears to be about 15'x20'.
Here is a picture of the newly discovered walkway and the new fence behind it:

And here are two pictures of the 4' fence and patio area. In the second picture you can make out a small portion of the patio under the dirt, it's a basket-weave pattern.


The boards over the opening next to the house are temporary, I will be putting in a set of double gates here. Also, I left the fence posts long for now because I haven't decided what to do with them yet. I may cut them off at 6' and mount lights on each one or I may cut them lower and put some kind of topper on them.
Once the fence was finished I turned my attention to some indoor projects. The side hall was closed off with a wall to make a small bathroom in the early 20's, they also added-on a larger second room at the end of the side hall from what used to be a porch. there was no need for a 2 room bathroom so I tore down the wall back in March to return it to a side hall.
This is how the side hall has looked since then:
 I finally got tired of looking at the bare lathe and hung the sheetrock. I still have more of it to hang though, hopefully I can finish that off today so I can mud it.

I also wired up the ceiling fixtures here and in the main bathroom. For now I just have some art-deco looking fixtures that I found in the upstairs bedrooms. We'll be looking for antique chandeliers to replace them soon.

The finish looks brass in the picture but it's actually nickel.
I'll be doing more electrical today.
Here is a picture of the Plat with the fence drawn in:

The green lines are the sections of fence that are complete, the blue lines near the back of the house is a smaller 4' fence I built to section off the side yard from the rest of the yard. The red lines are the sections of fence that I haven't done yet.
The final section that needed to be completed since the last post was the smaller 4' fence. This fence surrounds an old brick patio that I discovered.
First I put in the posts:


To do this I had to cut the boxwood bushes way back, as I cut the bushes back I discovered a brick walkway between them that leads out to the side yard. I had planned on putting a small gate in the middle of the fence but I moved the location to the edge to line up with the walkway.
By the way, the brick patio is under all the weeds. leaves, and dirt in the pictures, I haven't finished uncovering them yet. The patio appears to be about 15'x20'.
Here is a picture of the newly discovered walkway and the new fence behind it:

And here are two pictures of the 4' fence and patio area. In the second picture you can make out a small portion of the patio under the dirt, it's a basket-weave pattern.


The boards over the opening next to the house are temporary, I will be putting in a set of double gates here. Also, I left the fence posts long for now because I haven't decided what to do with them yet. I may cut them off at 6' and mount lights on each one or I may cut them lower and put some kind of topper on them.
Once the fence was finished I turned my attention to some indoor projects. The side hall was closed off with a wall to make a small bathroom in the early 20's, they also added-on a larger second room at the end of the side hall from what used to be a porch. there was no need for a 2 room bathroom so I tore down the wall back in March to return it to a side hall.
This is how the side hall has looked since then:
 I finally got tired of looking at the bare lathe and hung the sheetrock. I still have more of it to hang though, hopefully I can finish that off today so I can mud it.
I also wired up the ceiling fixtures here and in the main bathroom. For now I just have some art-deco looking fixtures that I found in the upstairs bedrooms. We'll be looking for antique chandeliers to replace them soon.

The finish looks brass in the picture but it's actually nickel.
I'll be doing more electrical today.
Friday, September 4, 2009
Fence Gates
I haven't had time to post in the last week but I've gotten a lot done on the fence.
Last weekend I worked on the double driveway gates. I had someone weld up 2 frames out of angle iron for the gates. They are 10' by 5' each.

I painted them and the hinges with Rustoleum gloss black paint.

Then I attached one dog-ear picket to the edge of the frame so I could attach the hinges.

Then I was able to prop the gate up against the post, I used a piece of 2x6 clamped to the edge of the gate to hold up the other side.

I used 6" hex head bolts to attach the hinges to the post.

With the gate hung I attached the dog-ears to the frame. to do this I had to first pre-drill each hole in the angle iron then screw the dog-ear in with deck screws.


Once I install the automatic gate openers I will finish off the little things that need to be done.
I've also completed most of the fence line.


I found this rat snake the other day while working on the fence, it looks like a rat or a squirrel bit him in a few places. We cleaned him up a bit then took him a few miles down the road to a creek with a lot of woods around it.
Last weekend I worked on the double driveway gates. I had someone weld up 2 frames out of angle iron for the gates. They are 10' by 5' each.

I painted them and the hinges with Rustoleum gloss black paint.

Then I attached one dog-ear picket to the edge of the frame so I could attach the hinges.

Then I was able to prop the gate up against the post, I used a piece of 2x6 clamped to the edge of the gate to hold up the other side.

I used 6" hex head bolts to attach the hinges to the post.

With the gate hung I attached the dog-ears to the frame. to do this I had to first pre-drill each hole in the angle iron then screw the dog-ear in with deck screws.


Once I install the automatic gate openers I will finish off the little things that need to be done.
I've also completed most of the fence line.


I found this rat snake the other day while working on the fence, it looks like a rat or a squirrel bit him in a few places. We cleaned him up a bit then took him a few miles down the road to a creek with a lot of woods around it.
Wednesday, August 26, 2009
More fence pics
The fence is coming along nicely.


 I'm hoping to have the yard completely enclosed in another day or two.


 I'm hoping to have the yard completely enclosed in another day or two.
Tuesday, August 25, 2009
More fence work
I was back at work on the fence yesterday afternoon. I didnt get near as much done as I'd hoped.
I worked mainly on the back fence line.

 I added the stringers to all the posts and put up about 2 1/2 panels of dog-ears.
 The picture above is of the gateway at the side of the house. I finished up the small section next to the house. Hopefully today I can build and install this gate.
I worked mainly on the back fence line.

 I added the stringers to all the posts and put up about 2 1/2 panels of dog-ears.
 The picture above is of the gateway at the side of the house. I finished up the small section next to the house. Hopefully today I can build and install this gate.
Monday, August 24, 2009
Back to the fence
This past weekend I got back to work on the fence. I've been working on the section in the back yard. This area is very overgrown and took quite a bit of time to clear out.

The above picture is the far back property line, our barn is about 6" over the line so I have to build the fence into the side of the barn to keep it inside the property line.
 This one is the back right property line looking back. The line breaks right at the oak 40' before turning and going up to the street.

Here is the back property line with the posts in the ground, I'm digging all the holes by hand with a post hole digger so it's slow going.


The last two images above are the posts on the right property line. hopefully today I can get the cross braces up and start on the dog-ear pickets.

The above picture is the far back property line, our barn is about 6" over the line so I have to build the fence into the side of the barn to keep it inside the property line.
 This one is the back right property line looking back. The line breaks right at the oak 40' before turning and going up to the street.
Here is the back property line with the posts in the ground, I'm digging all the holes by hand with a post hole digger so it's slow going.


The last two images above are the posts on the right property line. hopefully today I can get the cross braces up and start on the dog-ear pickets.
Wednesday, August 12, 2009
Laundry Room
I stopped working on the fence for a little bit to work on the Laundry room. I had to do this because we were quickly running out of clothes.
The first thing I did was run all the wiring in the floor that needed to be run, this includes the wiring for the overhead lights in the Dining room, kitchen, and bathroom below. With that done I laid R-30 insulation down and installed the sub-floor over it.
Here is part of the sub-floor going down:

Next I built the knee-wall where the washer/dryer will go.
 I also installed the sub-panel, this will feed the upstairs rooms.

Here's a question for you Electricians out there, is this sub-panel wired correctly? The main panel is wired with a neutral ground so I added a wire between neutral and ground in this panel.
Next I hung the sheet-rock in the washer/dryer area. installed the dryer plug and vent hole after this picture.

Then I set up the washer and dryer.

This is all I'm going to do on this for now, we have a working washer and dryer and there are more pressing things to do... like maybe getting some electricity to the upstairs bedrooms. We're using flashlights to get around upstairs at night right now.
The first thing I did was run all the wiring in the floor that needed to be run, this includes the wiring for the overhead lights in the Dining room, kitchen, and bathroom below. With that done I laid R-30 insulation down and installed the sub-floor over it.
Here is part of the sub-floor going down:

Next I built the knee-wall where the washer/dryer will go.
 I also installed the sub-panel, this will feed the upstairs rooms.
Here's a question for you Electricians out there, is this sub-panel wired correctly? The main panel is wired with a neutral ground so I added a wire between neutral and ground in this panel.
Next I hung the sheet-rock in the washer/dryer area. installed the dryer plug and vent hole after this picture.

Then I set up the washer and dryer.

This is all I'm going to do on this for now, we have a working washer and dryer and there are more pressing things to do... like maybe getting some electricity to the upstairs bedrooms. We're using flashlights to get around upstairs at night right now.
Tuesday, August 4, 2009
Fence pt. 2
Work continues on the privacy fence.


 The section of fence in the picture below runs along the carport. It's a tight squeeze between the carport and a large Pecan tree. The tree is directly on the property line.
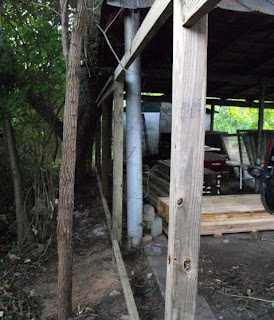 As you can see I had to get creative with the fence here, I'm hoping that the tree is just about done growing...


 The section of fence in the picture below runs along the carport. It's a tight squeeze between the carport and a large Pecan tree. The tree is directly on the property line.
 As you can see I had to get creative with the fence here, I'm hoping that the tree is just about done growing...
Subscribe to:
Posts (Atom)