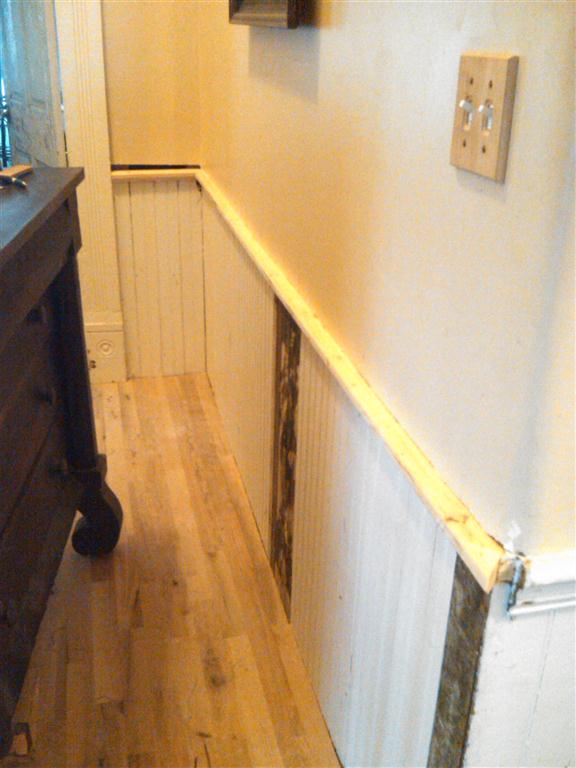
I've spent the last few weeks working on the house. The side hall was the first project I worked on.
Back in October of last year I laid the new oak flooring in the side hall but I never finished the last row.
It only took about an hour to install the final row of flooring, but last year I spent two sixteen hour days on it and by the time I got to the last row, which I had to rip down to the right size, I was just too tired to finish.
With the floor finally finished I turned to the chair rail. I was originally going to have some made for me but once I looked closely at the profile I realized that I had a router bit that could do it in two passes.
It's an almost perfect match to the original. Next I finished the sheetrock above the chair rail.
The trim that makes the bottom part of the chair rail will have to be made, I cant do it and there is nothing even close at the store.
Here are a few pics of the side hall now.
Left to do still is the trim for the bottom of the chair rail, picture rail, and crown. Oh, and replicate a leg for the Empire dresser...
Showing posts with label Plaster/Drywall. Show all posts
Saturday, December 31, 2011
Thursday, December 1, 2011
Finishing the Main Bathroom walls
The other project I worked on during my week off was getting the walls done in the main bathroom.
This has been like this since '09. I finished hanging the sheetrock then taped and mudded the walls.
Then I put up a coat of primer.
I liked the sink vanity I had on this room, it was an old oak dresser that I converted into a vanity, but my wife really wanted another one I made in here instead.
This is the very first piece of furniture I ever made. I made it back in '05. It was an old desk originally, I built the doors and the mirror onto it. The spindles are from the footboard of my wife's grandmothers bed. (The footboard was all that was left of it.)
I also installed the chandelier.
It is solid brass including the candle covers.
I still have to install 1/4 round on the ceiling, Wire up the outlet, caulk, cut in the primer, paint, and strip and paint the door.
This has been like this since '09. I finished hanging the sheetrock then taped and mudded the walls.
Then I put up a coat of primer.
I liked the sink vanity I had on this room, it was an old oak dresser that I converted into a vanity, but my wife really wanted another one I made in here instead.
This is the very first piece of furniture I ever made. I made it back in '05. It was an old desk originally, I built the doors and the mirror onto it. The spindles are from the footboard of my wife's grandmothers bed. (The footboard was all that was left of it.)
I also installed the chandelier.
It is solid brass including the candle covers.
I still have to install 1/4 round on the ceiling, Wire up the outlet, caulk, cut in the primer, paint, and strip and paint the door.
Labels:
Bathroom,
furniture,
Paint,
Plaster/Drywall,
plumbing
Monday, November 28, 2011
Dining Room
I took Thanksgiving week off to finish up some projects around the house.
The Dining Room was what I really wanted to get done the most. It has been half done since I moved the wall to make more room in the kitchen almost three years ago.
Here is what it looked like at the beginning of last week.
First I moved everything but the furniture out of the room, then I moved the furniture to the center of the room.
Next I scrapped the peeling walls above the picture rail. Once it was all scraped I mudded above the picture rail completely around the room.
With that done I worked on the door casings for the exterior door and the door that leads to the hallway.
The casings on the door that lead to the hallway had separated and were loose. I removed them and reinstalled them properly.
Next I worked on the door casings for the exterior door. You may remember in previous posts that the original doorway was closed off in the past and I reverted it back to a doorway.
First I finished mudding the area.
Next I began working on the casing and rosettes. the only two rosettes I had left were both split in half. I used my doweling jig and glued them back together with dowels.
Once they were dry I installed them above the door along with the casing.
Next I installed the picture rail on the wall that I rebuilt.
With that done I was ready for paint. I went around the room and glued down any loose wallpaper.
I really hated to paint over the wallpaper but there were just too many places where the paper was in too bad a shape.
First I primered and painted the trim.
Then I primered and painted the walls. It turned out that there was something wrong with the paint I chose, it was way lighter than the paint sample at the store. I didn't have a choice though and had to use it. I painted on Thanksgiving morning so we had to hurry and get the furniture back together for Thanksgiving dinner so I didnt get any pictures until after the dinner.
I also had to do some last minute electrical to get an outlet in for the china cabinet light.
I still have a lot of wainscoting to caulk and paint, I need to have some casing replicated for the door to the kitchen, and the ceiling needs to be primered and painted.
The Dining Room was what I really wanted to get done the most. It has been half done since I moved the wall to make more room in the kitchen almost three years ago.
Here is what it looked like at the beginning of last week.
First I moved everything but the furniture out of the room, then I moved the furniture to the center of the room.
Next I scrapped the peeling walls above the picture rail. Once it was all scraped I mudded above the picture rail completely around the room.
With that done I worked on the door casings for the exterior door and the door that leads to the hallway.
The casings on the door that lead to the hallway had separated and were loose. I removed them and reinstalled them properly.
Next I worked on the door casings for the exterior door. You may remember in previous posts that the original doorway was closed off in the past and I reverted it back to a doorway.
First I finished mudding the area.
Next I began working on the casing and rosettes. the only two rosettes I had left were both split in half. I used my doweling jig and glued them back together with dowels.
Once they were dry I installed them above the door along with the casing.
Next I installed the picture rail on the wall that I rebuilt.
With that done I was ready for paint. I went around the room and glued down any loose wallpaper.
I really hated to paint over the wallpaper but there were just too many places where the paper was in too bad a shape.
First I primered and painted the trim.
Then I primered and painted the walls. It turned out that there was something wrong with the paint I chose, it was way lighter than the paint sample at the store. I didn't have a choice though and had to use it. I painted on Thanksgiving morning so we had to hurry and get the furniture back together for Thanksgiving dinner so I didnt get any pictures until after the dinner.
I also had to do some last minute electrical to get an outlet in for the china cabinet light.
I still have a lot of wainscoting to caulk and paint, I need to have some casing replicated for the door to the kitchen, and the ceiling needs to be primered and painted.
Labels:
antique furniture,
Dining room,
Electrical,
Paint,
Plaster/Drywall,
Wallpaper
Monday, July 25, 2011
Dining Room Wall sheetrock complete
I finally completed the sheetrock and mudding on the Dining Room wall.
I'll be pretty busy at work this week but hopefully I can squeeze in some time to get the picture rail hung and then primer the wall. It will probably be this weekend before I can scrape, primer, and paint the entire room.
Wednesday, July 20, 2011
Dining Room Walls
Two and a half years ago I moved the wall between the Kitchen and the Dining Room three and a half feet to make more room in the kitchen. I put sheetrock up but never got around to mudding it.
Yesterday I finally decided to finish it. I had to put up a few small pieces first. Then I taped and mudded it.
Today I will sand and put up the second coat.
On another note, we have unfortunately decided to paint over the wallpaper. I really liked it but it has a lot of issues. I would just tear it off the wall, it's vinyl and comes off real easy, but there are two other layers underneath and they are paper. That's a nightmare I dont want to get into right now.
Yesterday I finally decided to finish it. I had to put up a few small pieces first. Then I taped and mudded it.
Today I will sand and put up the second coat.
On another note, we have unfortunately decided to paint over the wallpaper. I really liked it but it has a lot of issues. I would just tear it off the wall, it's vinyl and comes off real easy, but there are two other layers underneath and they are paper. That's a nightmare I dont want to get into right now.
Labels:
Dining room,
Paint,
Plaster/Drywall,
Wallpaper
Monday, November 8, 2010
More house caulking and main bath sheetrock
Work has been steadily progressing on caulking the house. There are now only two walls left to do, our back bedroom wall and the front guest room wall.
Here is an in progress shot of the master bedroom and living room wall. This wall is the hardest to get to because of the power line running in front of it. The ground slopes away on this side of the house so it's also taller by about 4'.
We had to use an extension ladder on top of the scaffolding to reach the peak. We use two walk boards, one below the other to hold the ladder in place. The upper walk board is clamped into place and the ladder is wedged against it so it cant move.
This is my helper on the ladder caulking at the peak of the gable. I'm glad he's not afraid of heights because I wasn't about to get up there...
Over the weekend I also continued the sheetrocking of the main bathroom. I noticed that a lot of cold air was getting into the house through the open walls.
This door goes to the Study. I dont need a door here so it's getting covered over. I pulled the casing off and sheetrocked over it. I will frame it in from the other side once I start on the study. I had to ad a lot of 1x6's to the wall to shim it out.
This is as far as I got, I had to turn my attention back to caulking the house.
All the work I have been doing lately, laying the floor in the side hall, putting up sheetrock in the bathroom, caulking the outside, has really helped with keeping the cold out. It's been getting down to 27 each night but it's been staying relatively warm inside. The heating system doesnt have to work near as hard to keep it at 65.
As soon as the house is completely caulked we'll be spraying on another coat of primer then brushing on the final coat of paint.
Here is an in progress shot of the master bedroom and living room wall. This wall is the hardest to get to because of the power line running in front of it. The ground slopes away on this side of the house so it's also taller by about 4'.
We had to use an extension ladder on top of the scaffolding to reach the peak. We use two walk boards, one below the other to hold the ladder in place. The upper walk board is clamped into place and the ladder is wedged against it so it cant move.
This is my helper on the ladder caulking at the peak of the gable. I'm glad he's not afraid of heights because I wasn't about to get up there...
Over the weekend I also continued the sheetrocking of the main bathroom. I noticed that a lot of cold air was getting into the house through the open walls.
This door goes to the Study. I dont need a door here so it's getting covered over. I pulled the casing off and sheetrocked over it. I will frame it in from the other side once I start on the study. I had to ad a lot of 1x6's to the wall to shim it out.
This is as far as I got, I had to turn my attention back to caulking the house.
All the work I have been doing lately, laying the floor in the side hall, putting up sheetrock in the bathroom, caulking the outside, has really helped with keeping the cold out. It's been getting down to 27 each night but it's been staying relatively warm inside. The heating system doesnt have to work near as hard to keep it at 65.
As soon as the house is completely caulked we'll be spraying on another coat of primer then brushing on the final coat of paint.
Thursday, August 12, 2010
Hall Corner
I've finished the outside corner where the two halls join.
I sanded and put the final coat of mud up on Tuesday.
Then last night I did the final sanding and painted it.
Next up I need to finish the side hall. As you can see from the pictures above I have a lot of work to do on the beadboard. The side hall was turned into a bathroom in 1922, at some point after that the beadboard was covered up with paneling that was glued to it with some kind of black tar. It's this tar that I need to remove before I can paint it.
I also need to have some picture rail and chair rail replicated for this area as the original is long gone, it was most likely removed when the paneling was put up. The gap between the sheetrock and the beadboard is for the chair rail. I also need to find some crown for the ceiling.
I sanded and put the final coat of mud up on Tuesday.
Then last night I did the final sanding and painted it.
Next up I need to finish the side hall. As you can see from the pictures above I have a lot of work to do on the beadboard. The side hall was turned into a bathroom in 1922, at some point after that the beadboard was covered up with paneling that was glued to it with some kind of black tar. It's this tar that I need to remove before I can paint it.
I also need to have some picture rail and chair rail replicated for this area as the original is long gone, it was most likely removed when the paneling was put up. The gap between the sheetrock and the beadboard is for the chair rail. I also need to find some crown for the ceiling.
Labels:
main hall,
Paint,
Plaster/Drywall,
side hall
Tuesday, August 10, 2010
Main Hall
I worked on the hallways over the weekend. I finished the main hall and almost finished the side hall.
After the final coat and sanding of mud I primered everything.
The corner between the two hallways is coming along.
It needs a sanding, one more coat of mud then a final sanding.
I went ahead and painted the main hall to get it done and out of the way.
I'm hoping to finish up the side hall in the next day or two.
After the final coat and sanding of mud I primered everything.
The corner between the two hallways is coming along.
It needs a sanding, one more coat of mud then a final sanding.
I went ahead and painted the main hall to get it done and out of the way.
I'm hoping to finish up the side hall in the next day or two.
Labels:
main hall,
Paint,
Plaster/Drywall,
side hall
Monday, August 2, 2010
Side Hall
This weekend I worked on the side hall. Here is a pic of how the hall looked last year:
I knew I wasn't going to finish it on my own so I hired on someone to help me. We took down all the plaster and lathe, then put up a few 2x4 studs in the corners, then put up sheetrock, then tape and mud.
Here it is after this weekend:
The small gap between the sheetrock and the wainscotting is for the chair rail that I need to have cut. I'll sand today and put up one more coat of mud. Then I can do the final sanding, primer, then paint.
I knew I wasn't going to finish it on my own so I hired on someone to help me. We took down all the plaster and lathe, then put up a few 2x4 studs in the corners, then put up sheetrock, then tape and mud.
Here it is after this weekend:
The small gap between the sheetrock and the wainscotting is for the chair rail that I need to have cut. I'll sand today and put up one more coat of mud. Then I can do the final sanding, primer, then paint.
Labels:
Demo,
main hall,
Plaster/Drywall,
side hall
Subscribe to:
Posts (Atom)