Showing posts with label plumbing. Show all posts

Thursday, December 1, 2011

Finishing the Main Bathroom walls

The other project I worked on during my week off was getting the walls done in the main bathroom.


This has been like this since '09. I finished hanging the sheetrock then taped and mudded the walls.


Then I put up a coat of primer.


I liked the sink vanity I had on this room, it was an old oak dresser that I converted into a vanity, but my wife really wanted another one I made in here instead.


This is the very first piece of furniture I ever made. I made it back in '05. It was an old desk originally, I built the doors and the mirror onto it. The spindles are from the footboard of my wife's grandmothers bed. (The footboard was all that was left of it.)


I also installed the chandelier.


It is solid brass including the candle covers.

I still have to install 1/4 round on the ceiling, Wire up the outlet, caulk, cut in the primer, paint, and strip and paint the door.

Thursday, August 19, 2010

Side Hall Wainscoting

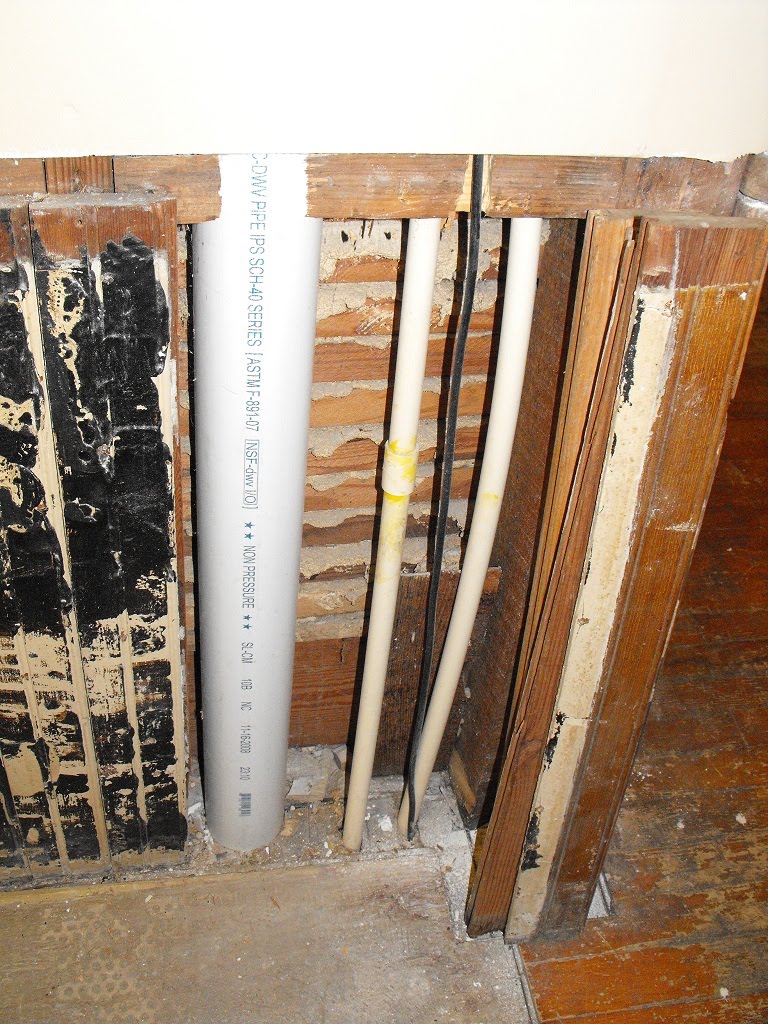
Last night I finished the side hall wainscoting. In an earlier post I had shown how someone used black tar to stick paneling to the wall. This tar was all over the wainscoting. Here is a picture from last week, you can see the tar covering the wainscoting:


You can also see the missing boards to the right. These were removed to run the plumbing, electrical, cable, and the vacuum line.

The 3" drain pipe sticks out slightly from the wall so I couldn't just slap a board over it.


I had to remove some material from the back of the piece of beadboard for it to sit flush. I did this with a table saw.


Here are the boards test fitted into place:


The last board will need to be ripped to fit. I am not going to install the 3 boards that cover the vacuum line yet because I still need to tie it in under the house so I want to leave it open for easy access.

With all that done I got to work removing the tar. I started by using a heat gun but the tar just got very gooey and was making a worse mess. The best method I found for removing it was to use a very sharp scraper. I had to re-sharpen the scraper every 5 minutes or so but it worked pretty good.


Notice the outline on the wall? Looks like there was a large radiator here before it was converted to a bathroom.

Once all the tar was removed I sanded the boards smooth and then primered and painted them.


Next I need to get the chair rail and picture rail made. I also need to buy the oak T&G flooring, I am going to pull up the existing flooring all the way up to the edge of the main hall and then lay the new flooring down.. Before I do that though I need to fix the sub-floor just to the left of the bathroom door. The toilet sat here so it's in pretty bad shape.

Monday, July 26, 2010

Foyer and Side Hall

Wow, almost 2 months without a post! Things have been hectic around here lately. I have done some work on the house though. Two of the projects I have been working on are the Foyer and the Side Hall.

I've been dying to get the foyer done because it's the first thing everyone see's when entering the house. Here is a picture of how it looked before.


What you can not really see in this picture is the condition of the paint. The white trim is scratched, chipped, and stained and the red is just way too dark for this room.

I spent most of the last two days repainting all of the trim and the walls. Here are a few pictures of what it looks like now.


In the third picture you may have noticed that the front door is not repainted. I am holding off on doing that for now because I am debating on stripping and shellacking it.

You cant see it in the pictures but I removed all the carpeting from the stairs, they were carpeted above the first landing with a nasty old green carpet. The treads are in great shape except for a few paint stains. That shouldn't be too hard to remove.


The other project I have been working on is the side hall.


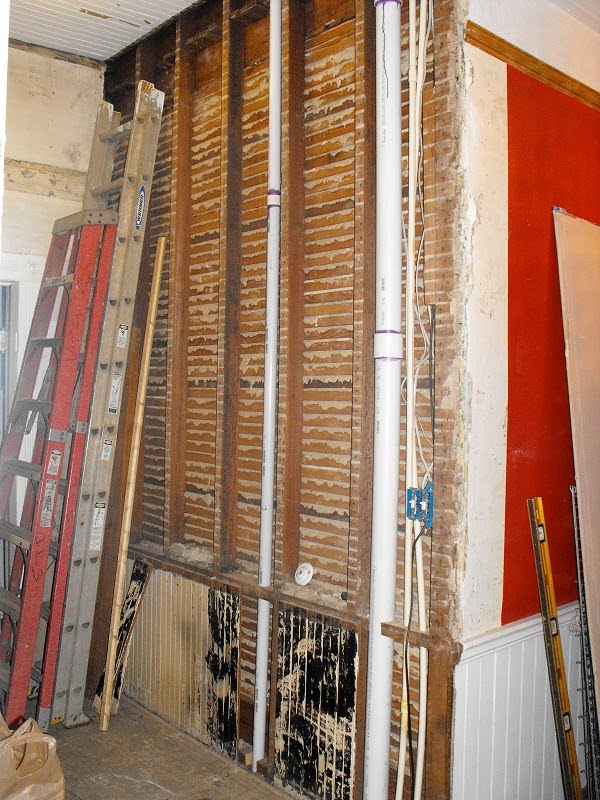
 I ran a 2" PVC vacuum line in the wall for the whole-house vacuum I intend to install in the future. This runs up into the laundry room in the attic.


I also ran some string in the wall for anything I may need to run in the future. One thing I need to run is an Ethernet cable for the video surveillance system I will be installing in the near future.

With that done I started putting up the sheetrock.


The side hall is in the back part of the house where the ceilings are 11', the main hall is 10'. The plumbing from the upstairs bathroom runs down this wall but it comes out from the bathroom floor into the side hall up near the ceiling. I had intended on boxing this in but was not looking forward to it.

Instead we decided to just paint the PVC pipe black to make it look like old cast iron pipe and leave it exposed.


I still need to put up sheetrock behind it but I think it will look fine.

Monday, February 1, 2010

Upstairs bathroom is complete

Well for now anyways. I still have a few small things left to do like some caulking, I need to paint the ceiling and I'll probably put some crown up too. I also need to find a mirror or small medicine cabinet and a satin nickel towel bar and toilet paper holder. I also need a light fixture for the ceiling (there's a bare bulb there now) and possibly one above the sink. And I need to install the baseboards too, they will be travertine.

Here are a few pictures of the work done over the last few days.


Here is the room after the second sanding of the mud. The window in this room is in very bad shape. It wasn't built properly in the first place and now it's falling apart. I an going to completely rebuild the window in the spring or early summer but for now I'm just cleaning it up and putting some new casing on it.

Here's the new casing on the window.


Next I painted the room, we found another can of oops paint that was the perfect color and even better it's semi-gloss. After painting the room I began installing the plumbing for the fixtures.


Installing the sink faucet was a huge pain in the ass. First the center hole on the bowl was not big enough for the faucet to fit through. I had to grind it out with my dremel, the bits I had were very cheap and china is very hard so I went through about a bit a minute but I was finally able to enlarge the hole enough for it to fit.

So then I finally get the entire faucet together and realize that I need to take the handles back out to be able to bolt the bowl to the wall. Now with the bowl up against the wall there is almost no room to work so putting the handles back in took a while. The next issue is that there is so little room under the sink that it was very hard to install the braided hoses without them kinking. There are two that go from the faucet to the handles then two that go from the handles to the supply valves.

I finally got it all together, here is a pic of it.


I think it looks pretty good, by the way we got both this faucet and the shower kit on closeout for about $160 total.

Here are the rest of the bathroom pics.

Sink

Toilet with antique toilet seat


The completed window.. for now


I figured I'd add a picture or two of what this bathroom looked like originally.


Thursday, January 28, 2010

Upstairs Bathroom

The grout is cured and I sealed the stone yesterday. I took my first shower in it this morning and it's awesome!

I finished putting up the sheetrock yesterday also. I still need to mud it though. Then I can paint and install the sink and toilet.


Friday, January 22, 2010

Bathroom Floor

Yesterday I finally got around to laying the bathroom floor. I had temporarily installed the toilet a few months back so I removed it first.

Then I laid down the backer board.


and then laid the travertine.


Today I'll finish tiling the curb and hopefully grout everything.

Wednesday, August 12, 2009

Laundry Room

I stopped working on the fence for a little bit to work on the Laundry room. I had to do this because we were quickly running out of clothes.

The first thing I did was run all the wiring in the floor that needed to be run, this includes the wiring for the overhead lights in the Dining room, kitchen, and bathroom below. With that done I laid R-30 insulation down and installed the sub-floor over it.

Here is part of the sub-floor going down:


Next I built the knee-wall where the washer/dryer will go.

I also installed the sub-panel, this will feed the upstairs rooms.


Here's a question for you Electricians out there, is this sub-panel wired correctly? The main panel is wired with a neutral ground so I added a wire between neutral and ground in this panel.

Next I hung the sheet-rock in the washer/dryer area. installed the dryer plug and vent hole after this picture.


Then I set up the washer and dryer.


This is all I'm going to do on this for now, we have a working washer and dryer and there are more pressing things to do... like maybe getting some electricity to the upstairs bedrooms. We're using flashlights to get around upstairs at night right now.

Tuesday, July 7, 2009

Back to work

I can finally get back to work on the house now that my work schedule has returned to normal.

One of the first things we did was to start clearing out rooms. We want to move in as soon as possible so we will need some living space.

The parlor has been our furniture storage space for the past few months. We emptied it out and setup our parlor furniture.


We are going to try to save the wallpaper in here, it will need to be patched in a few areas and will need a thorough cleaning.


Both of the above chairs will be recovered to match the parlor set.

The next two pieces were found at a yard sale in Alabama.


After much research I believe both pieces to be from the early 1800's (1820-1840). They are Empire style. We got the couch for $35 and the dresser for $25. I will need to replicate a leg for the dresser.

Next we turned our attention to the Living Room. This room has been a storage area for all of my tools and wood.

After clearing out the room, I pulled the mantle the rest of the way off of the wall so I could reattach it properly. Behind the mantle I found a small flyer.


Looking up info on KaDell-Kritchfield I found that they were a theater troupe that did their shows under a big top in the late 1800's and early 1900's.

The other project that we've been working on is the first floor bathroom. The floor has to be finished before the rest of the plumbing can be installed.

I decided to go with a Tung Oil finish. Here is the floor after the first two coats.


The tung oil really gives the floor a great warm color.