We've been wanting to tackle this project for a while now. The front walkway was nothing but weeds and broken concrete.
Across the street from us is the old Woodbury Oil Mill, it was built in 1902, now it's a fertilizer plant. A section of one of the brick buildings collapsed a few years back and all the brick was left where it fell. I asked them about it and they told me that I could take as many as I needed. Perfect! The brick is from the same era as the house.
I began by breaking up and removing all the concrete, below is an in progress shot..
With all the concrete removed I leveled the pad.
The ground slopes downward towards the right in the above picture. The soil is a combination of gravel, coal, and a little bit of dirt mixed in, needless to say it was quite hard to level off. I had to borrow a tractor from a friend to get it level.
Next I put down a layer of sand then began the process of laying the brick... well almost, first I had to gather up the brick, then scrape all the old mortar off of them.
Here is an in progress shot, I'm using two rows for the border then a standard stretcher bond pattern for the infill.
It took all three days of the three day weekend but I finally finished it.
This afternoon I'll get some more sand and fill in the joints.
Tuesday, July 5, 2011
Wednesday, June 15, 2011
Porch Update
I finished painting the white trim area on the porch and finished up installing the drip edge.
This is how the porch looks as of now.
Next I'm going to turn my attention to the upstairs balcony.
This is how the porch looks as of now.
Next I'm going to turn my attention to the upstairs balcony.
Thursday, June 9, 2011
Installing drip edge on porch roof
Yesterday I began installing the drip edge on the porch roof. I should have done this last year when I installed the shingles but for some reason I didnt.
I had to cut the drip edge for the curved section of the roof. It's sort of like a kerf cut.
I was able to complete about 2/3 of the roof. I still have to paint the other part before I put the drip edge up.
I had to cut the drip edge for the curved section of the roof. It's sort of like a kerf cut.
I was able to complete about 2/3 of the roof. I still have to paint the other part before I put the drip edge up.
Before
After
Monday, June 6, 2011
Screen Porch
Over the weekend I worked on the screen porch. I had mentioned earlier that there was one small section that I didnt get screened in because I needed to finish framing it in. When this was a sunroom this section was just closed off, there wasnt a window here. You can see the section I'm talking about in this picture from last week. It's the small strip between the column and the wall.
Here is the basic framing.
Instead of hacking up the trim on the columns as was done previously I cut the framing to fit around the trim.
You can see the missing trim that was cut away previously, this will be replaced later.
I added beadboard to the top to match the rest of the porch then primered and painted it and installed the screen.
There are still lots of little trim pieces to add to it but I needed to hurry and get the final screen up.
With the porch completely screened in we cleared the room out and pulled up the masonite that was stapled down to the original floor. It took about an hour to pull out all the 1" long staples from the floor.
With that done we brought our wicker furniture in.
The next day I began work on the brackets for the screen doors. We still have one original screen door on the house, it is on the upstairs front porch door. The screen door is built the exact same way but it has some very nice brackets on them.
I removed one of the brackets to use as a pattern.
Sixteen brackets later and I primered and painted them.
Then installed them.
Man, what a difference it makes. Soon I'll build a screen door for the front door, then all the screen doors on the house will match.
Here is the basic framing.
Instead of hacking up the trim on the columns as was done previously I cut the framing to fit around the trim.
You can see the missing trim that was cut away previously, this will be replaced later.
I added beadboard to the top to match the rest of the porch then primered and painted it and installed the screen.
There are still lots of little trim pieces to add to it but I needed to hurry and get the final screen up.
With the porch completely screened in we cleared the room out and pulled up the masonite that was stapled down to the original floor. It took about an hour to pull out all the 1" long staples from the floor.
With that done we brought our wicker furniture in.
The next day I began work on the brackets for the screen doors. We still have one original screen door on the house, it is on the upstairs front porch door. The screen door is built the exact same way but it has some very nice brackets on them.
I removed one of the brackets to use as a pattern.
Sixteen brackets later and I primered and painted them.
Then installed them.
Man, what a difference it makes. Soon I'll build a screen door for the front door, then all the screen doors on the house will match.
Thursday, June 2, 2011
Columns complete
Yesterday afternoon I finished painting the columns. I still have some trim to install on them but that needs to wait until the railing and balusters get installed.
I also attached the aluminum screen to the doors, installed them, and installed the screen all the way around the screen porch (except for one small area that needs some more framing). Hopefully today I can scrape, primer, paint and install the trim that covers the edges of the screen.
Tuesday, May 31, 2011
Front Porch Work
Well I've finally gotten back to work on the house. It feels really good to be accomplishing things on the house again. It's been almost 6 months now... I took the entire week off last week so I could get the front porch done.
I was so excited about getting back to work again that I forgot to take pictures the first few days.
I started by clearing out the screen porch area, it had become a holding space for new antiques in need of restoration. Then I began installing the 2x4 framing that the screen will attach to. While I was doing this I had some help that was scraping old paint and primering on the rest of the porch.
There was an area of the framing on the screen porch that was missing. It was made this way but I still cant figure out why. Anyways I built the sill just like the rest of it. Here is a pic of it (sorry, no before pic).
I will fill the seams in with bondo and sand it smooth.
I found a nice set of wood screen doors at Home Depot for $20 each! I had to widen the doorway by 6" and cut down the doors by about 4" for them to fit. I used a dowel jig to reattach the top part of the door.
In the above picture they are just sitting in place. I took out the fiberglass screen and will be using aluminum screen in it's place.
Next I got back to stripping the columns. The last time I worked on the columns was last year, you can see those posts here, and here.
The double column at the right side of the stairs had a lot of rot at the bottom. Unfortunately there was no saving the bottom section. The wood used in the columns is 1" and 1 1/4" thick so I bought 2x6's and 2x8's and ripped them down to the correct thickness. Here is the rebuilt bottom section, as I mentioned before I didnt get pictures for the first few days so I dont have a before picture of the column base.
Then I installed the top part of the column and primered it. The capital of the column was also rotted. The way it's built it has a large block of wood in the center and the decorative trim is attached to it. The large block of wood is what was rotted. I used an old sill beam to get the correct size piece of wood I needed, 3 1/2"x6 3/4"x18". I ripped it to size then attached the trim to it.
Then I installed the column.
The capital is built wrong so I'm going to need to take it back down and rebuild it.
Another capital had a lot of rot so I had to rebuild it as well. This one is not near as complex as the double one.
As you can see from the picture above there are only two original pieces on this one. I ripped the block of wood to size then cut out the decorative trim by tracing an original piece from another capital on to a 1x6, then cutting it out with a jig saw. I used wood hardener on the original piece that had some rot.
Next I finished rebuilding the soffets and facia on the porch roof. Here is a before picture of one of the areas.
And here is after installing the soffet and facia.
The spray foam is a small area of rot that I couldnt cut out. I filled it with the spray foam then I'm going to cut it down and cover it with bondo then sand it smooth. I still need to install the facia trim in two areas that you can see missing in the pic.
In the before picture above you can see that the ceiling was missing from the front part of the porch. That was the next thing that I installed.
With all the columns finally installed I began painting them.
I finished four columns before it got dark on me. I will finish painting the rest of the columns this afternoon then finish painting the screen porch area so I can install the screen.
I was so excited about getting back to work again that I forgot to take pictures the first few days.
I started by clearing out the screen porch area, it had become a holding space for new antiques in need of restoration. Then I began installing the 2x4 framing that the screen will attach to. While I was doing this I had some help that was scraping old paint and primering on the rest of the porch.
There was an area of the framing on the screen porch that was missing. It was made this way but I still cant figure out why. Anyways I built the sill just like the rest of it. Here is a pic of it (sorry, no before pic).
I will fill the seams in with bondo and sand it smooth.
I found a nice set of wood screen doors at Home Depot for $20 each! I had to widen the doorway by 6" and cut down the doors by about 4" for them to fit. I used a dowel jig to reattach the top part of the door.
In the above picture they are just sitting in place. I took out the fiberglass screen and will be using aluminum screen in it's place.
Next I got back to stripping the columns. The last time I worked on the columns was last year, you can see those posts here, and here.
The double column at the right side of the stairs had a lot of rot at the bottom. Unfortunately there was no saving the bottom section. The wood used in the columns is 1" and 1 1/4" thick so I bought 2x6's and 2x8's and ripped them down to the correct thickness. Here is the rebuilt bottom section, as I mentioned before I didnt get pictures for the first few days so I dont have a before picture of the column base.
Then I installed the top part of the column and primered it. The capital of the column was also rotted. The way it's built it has a large block of wood in the center and the decorative trim is attached to it. The large block of wood is what was rotted. I used an old sill beam to get the correct size piece of wood I needed, 3 1/2"x6 3/4"x18". I ripped it to size then attached the trim to it.
Then I installed the column.
The capital is built wrong so I'm going to need to take it back down and rebuild it.
Another capital had a lot of rot so I had to rebuild it as well. This one is not near as complex as the double one.
As you can see from the picture above there are only two original pieces on this one. I ripped the block of wood to size then cut out the decorative trim by tracing an original piece from another capital on to a 1x6, then cutting it out with a jig saw. I used wood hardener on the original piece that had some rot.
Next I finished rebuilding the soffets and facia on the porch roof. Here is a before picture of one of the areas.
And here is after installing the soffet and facia.
The spray foam is a small area of rot that I couldnt cut out. I filled it with the spray foam then I'm going to cut it down and cover it with bondo then sand it smooth. I still need to install the facia trim in two areas that you can see missing in the pic.
In the before picture above you can see that the ceiling was missing from the front part of the porch. That was the next thing that I installed.
With all the columns finally installed I began painting them.
I finished four columns before it got dark on me. I will finish painting the rest of the columns this afternoon then finish painting the screen porch area so I can install the screen.
Wednesday, April 13, 2011
Atwater Kent Model 10C
Sorry, this is not a post on the house progress. I am pretty much done with my hiatus though and will be getting back to work very soon.
This post is about an old radio that I just bought. It is so cool that I just had to share it here.
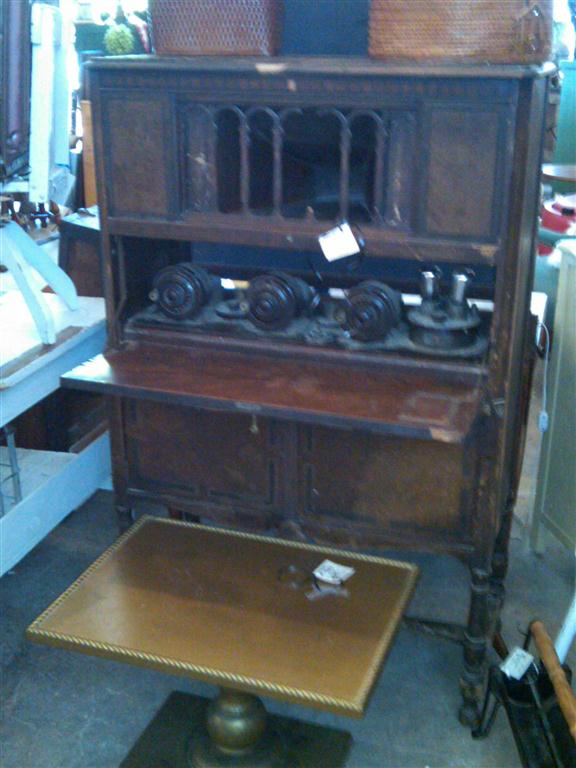
Here is how I found it at an antique mall:
I'd never seen anything like it and was immediately interested. It turns out that they are quite rare.
It's an Atwater Kent Model 10C radio in a Pooley cabinet from 1924. This was very early in the history of the radio era, the first radio station started broadcasting in 1920.
The radio is tuned by all three dials, the knob in between the first and second stage controls the volume. The knob on the right below the tubes also controls the volume somewhat. Not sure what the knob on the first RF coil on the left controls.
After bringing it home I started cleaning it.
Here is a picture of the radio removed from the cabinet:
As you can see it's quite dirty. The radio by itself is called a breadboard by the way.
Here is the radio after a bit of cleaning:
The cabinet needs a lot of work, I'm going to have to remove and replace a lot of veneer and refinish the entire cabinet.
I cleaned the radio with a damp cloth but it still needs a lot more cleaning and I'd really like to get it working. It's missing 3 vacuum tubes which aren't cheap. I've found a few sets on E-bay but they run about $250 for the whole set of 5.
I'll take more pictures once I have restored it.
This post is about an old radio that I just bought. It is so cool that I just had to share it here.
Here is how I found it at an antique mall:
I'd never seen anything like it and was immediately interested. It turns out that they are quite rare.
It's an Atwater Kent Model 10C radio in a Pooley cabinet from 1924. This was very early in the history of the radio era, the first radio station started broadcasting in 1920.
The radio is tuned by all three dials, the knob in between the first and second stage controls the volume. The knob on the right below the tubes also controls the volume somewhat. Not sure what the knob on the first RF coil on the left controls.
After bringing it home I started cleaning it.
Here is a picture of the radio removed from the cabinet:
As you can see it's quite dirty. The radio by itself is called a breadboard by the way.
Here is the radio after a bit of cleaning:
The cabinet needs a lot of work, I'm going to have to remove and replace a lot of veneer and refinish the entire cabinet.
I cleaned the radio with a damp cloth but it still needs a lot more cleaning and I'd really like to get it working. It's missing 3 vacuum tubes which aren't cheap. I've found a few sets on E-bay but they run about $250 for the whole set of 5.
I'll take more pictures once I have restored it.
Monday, February 7, 2011
Airstream Break
We're taking a break on the restoration of the house as we've bought another Airstream and are trying to get it restored before we go camping next month. It's a 1969 Airstream Sovereign just like our first one.
Tuesday, December 21, 2010
Attic Insulation
This is one of those projects that I'm extremely glad is over. With the cold weather back for the winter I finally decided that I had to do something about the insulation. Our heating bill last year was sky high. I've already noticed some difference since I caulked the entire outside of the house but I knew we could do a lot better.
The attic was a huge mess.
It seems that over the years when the roofers would replace an old cedar shingle roof with a new one they would leave whatever dropped in the attic. There was also a ton of old coal dust. This was the worst. It has the consistency of baby power so it gets all over everything. I was completely black from head to toe for the three days it took to clean the attic out.
I started by using a large metal dust pan to scoop up piles of the debris and dumped it into a trash can. Then I would cart the trash can down stairs and outside and dump it into large contractor trash bags.
Once the large debris was removed I vacuumed up the rest with a shop-vac. When doing this it's imperative to use vacuum bags, otherwise the coal dust just clogs up the filter almost immediately.
After three days of this hell it was finally done and I was ready for insulation. The insulation only took about an hour and a half.
I think I have close to an R-19 value right now. In a few weeks I'm going to double the amount and go to R-30.
The attic was a huge mess.
It seems that over the years when the roofers would replace an old cedar shingle roof with a new one they would leave whatever dropped in the attic. There was also a ton of old coal dust. This was the worst. It has the consistency of baby power so it gets all over everything. I was completely black from head to toe for the three days it took to clean the attic out.
I started by using a large metal dust pan to scoop up piles of the debris and dumped it into a trash can. Then I would cart the trash can down stairs and outside and dump it into large contractor trash bags.
Once the large debris was removed I vacuumed up the rest with a shop-vac. When doing this it's imperative to use vacuum bags, otherwise the coal dust just clogs up the filter almost immediately.
After three days of this hell it was finally done and I was ready for insulation. The insulation only took about an hour and a half.
I think I have close to an R-19 value right now. In a few weeks I'm going to double the amount and go to R-30.
Thursday, December 2, 2010
Exterior paint progress
Here are a some pictures from a few weeks back. I had my brother in law over for a day to help me out.
I stopped working over Thanksgiving and haven't had a chance to do anything since, I've been too busy with work. I'm hoping to get some things accomplished soon though.
Subscribe to:
Posts (Atom)


