Another project I completed is the doorway between the dining room and the kitchen. This is what it looked like before:
The first thing I did was to make and install the threshold. The kitchen floor is about 2" higher than the dining room floor because of all the leveling I had to do in the kitchen.
I used a piece of 5 1/4" oak flooring for the threshold, I cut both ends of the board at angles because the threshold will lay at an angle.
Once it was cut I cut and installed a shim piece to go below the threshold:
Then I installed the threshold:
With that done I installed the door casing. I found some casing that is very similar to the original casing in the house.
The casing is about an inch smaller than the original, I didn't have any rosettes that matched so I cut some blocks out of the oak flooring.
Once I have new casing cut to match the originals I will re-frame this doorway.
Showing posts with label flooring. Show all posts
Wednesday, January 4, 2012
Saturday, December 31, 2011
Finishing up the Side Hall
I've spent the last few weeks working on the house. The side hall was the first project I worked on.
Back in October of last year I laid the new oak flooring in the side hall but I never finished the last row.
It only took about an hour to install the final row of flooring, but last year I spent two sixteen hour days on it and by the time I got to the last row, which I had to rip down to the right size, I was just too tired to finish.
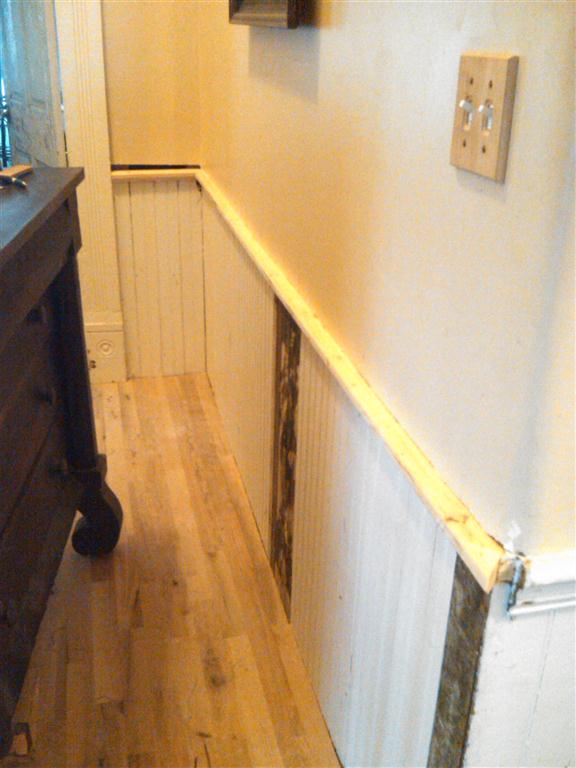
With the floor finally finished I turned to the chair rail. I was originally going to have some made for me but once I looked closely at the profile I realized that I had a router bit that could do it in two passes.
It's an almost perfect match to the original. Next I finished the sheetrock above the chair rail.
The trim that makes the bottom part of the chair rail will have to be made, I cant do it and there is nothing even close at the store.
Here are a few pics of the side hall now.
Left to do still is the trim for the bottom of the chair rail, picture rail, and crown. Oh, and replicate a leg for the Empire dresser...
Back in October of last year I laid the new oak flooring in the side hall but I never finished the last row.
It only took about an hour to install the final row of flooring, but last year I spent two sixteen hour days on it and by the time I got to the last row, which I had to rip down to the right size, I was just too tired to finish.
With the floor finally finished I turned to the chair rail. I was originally going to have some made for me but once I looked closely at the profile I realized that I had a router bit that could do it in two passes.
It's an almost perfect match to the original. Next I finished the sheetrock above the chair rail.
The trim that makes the bottom part of the chair rail will have to be made, I cant do it and there is nothing even close at the store.
Here are a few pics of the side hall now.
Left to do still is the trim for the bottom of the chair rail, picture rail, and crown. Oh, and replicate a leg for the Empire dresser...
Labels:
antique furniture,
flooring,
Paint,
Plaster/Drywall,
side hall
Monday, June 6, 2011
Screen Porch
Over the weekend I worked on the screen porch. I had mentioned earlier that there was one small section that I didnt get screened in because I needed to finish framing it in. When this was a sunroom this section was just closed off, there wasnt a window here. You can see the section I'm talking about in this picture from last week. It's the small strip between the column and the wall.
Here is the basic framing.
Instead of hacking up the trim on the columns as was done previously I cut the framing to fit around the trim.
You can see the missing trim that was cut away previously, this will be replaced later.
I added beadboard to the top to match the rest of the porch then primered and painted it and installed the screen.
There are still lots of little trim pieces to add to it but I needed to hurry and get the final screen up.
With the porch completely screened in we cleared the room out and pulled up the masonite that was stapled down to the original floor. It took about an hour to pull out all the 1" long staples from the floor.
With that done we brought our wicker furniture in.
The next day I began work on the brackets for the screen doors. We still have one original screen door on the house, it is on the upstairs front porch door. The screen door is built the exact same way but it has some very nice brackets on them.
I removed one of the brackets to use as a pattern.
Sixteen brackets later and I primered and painted them.
Then installed them.
Man, what a difference it makes. Soon I'll build a screen door for the front door, then all the screen doors on the house will match.
Here is the basic framing.
Instead of hacking up the trim on the columns as was done previously I cut the framing to fit around the trim.
You can see the missing trim that was cut away previously, this will be replaced later.
I added beadboard to the top to match the rest of the porch then primered and painted it and installed the screen.
There are still lots of little trim pieces to add to it but I needed to hurry and get the final screen up.
With the porch completely screened in we cleared the room out and pulled up the masonite that was stapled down to the original floor. It took about an hour to pull out all the 1" long staples from the floor.
With that done we brought our wicker furniture in.
The next day I began work on the brackets for the screen doors. We still have one original screen door on the house, it is on the upstairs front porch door. The screen door is built the exact same way but it has some very nice brackets on them.
I removed one of the brackets to use as a pattern.
Sixteen brackets later and I primered and painted them.
Then installed them.
Man, what a difference it makes. Soon I'll build a screen door for the front door, then all the screen doors on the house will match.
Monday, October 18, 2010
Side Hall Floor
This is a big project that I have been needing to get done for a while. Especially now that it's getting cold out. The cold air comes up through all the holes in the floor so this project had to get done.
As I've mentioned before the side hall was converted into a bathroom in 1928, last year I tore the wall down and turned it back into a side hall.
The Red Oak flooring on the first floor was installed over the original floor sometime in the 40's so the side hall didnt get done since it was a bathroom at the time.
I started by tearing up the plywood.
and found linoleum underneath.
I pulled that up and the original flooring under that was pretty rotted, which I had expected, so I pulled that up.
Of course most of the floor joists were rotted and hacked up and patched so I tore out the rotted ones and installed new ones. I used 2x8s ripped to a full 6" to match.
I took this opportunity to do a few other things under the house that needed to get done. I dug out a large area under the ducting so I could have access to underneath the bathroom, I ran some electrical from the bathroom, and I removed the 2 return vents that the moron HVAC guys had put in. They will be relocated to the dining room.
After that I put the sub-floor in with old 1x boards that I had.
Then I pulled up the old red oak flooring on the other side of the hall.
Then laid down felt paper.
Then I began the flooring. For the door sills that go to the bathroom and the sunroom I used 5" wide oak flooring. I kept the tongue on the sill so I could lock the flooring into it since it has grooves on the sides.
Here are some shots of the progress.
I still have a little strip along the wall to finish up. Not sure yet when I will be able to sand and finish it.
As I've mentioned before the side hall was converted into a bathroom in 1928, last year I tore the wall down and turned it back into a side hall.
The Red Oak flooring on the first floor was installed over the original floor sometime in the 40's so the side hall didnt get done since it was a bathroom at the time.
I started by tearing up the plywood.
and found linoleum underneath.
I pulled that up and the original flooring under that was pretty rotted, which I had expected, so I pulled that up.
Of course most of the floor joists were rotted and hacked up and patched so I tore out the rotted ones and installed new ones. I used 2x8s ripped to a full 6" to match.
I took this opportunity to do a few other things under the house that needed to get done. I dug out a large area under the ducting so I could have access to underneath the bathroom, I ran some electrical from the bathroom, and I removed the 2 return vents that the moron HVAC guys had put in. They will be relocated to the dining room.
After that I put the sub-floor in with old 1x boards that I had.
Then I pulled up the old red oak flooring on the other side of the hall.
Then laid down felt paper.
Then I began the flooring. For the door sills that go to the bathroom and the sunroom I used 5" wide oak flooring. I kept the tongue on the sill so I could lock the flooring into it since it has grooves on the sides.
Here are some shots of the progress.
I still have a little strip along the wall to finish up. Not sure yet when I will be able to sand and finish it.
Labels:
Demo,
Electrical,
flooring,
house history,
side hall
Thursday, August 19, 2010
Side Hall Wainscoting
Last night I finished the side hall wainscoting. In an earlier post I had shown how someone used black tar to stick paneling to the wall. This tar was all over the wainscoting. Here is a picture from last week, you can see the tar covering the wainscoting:
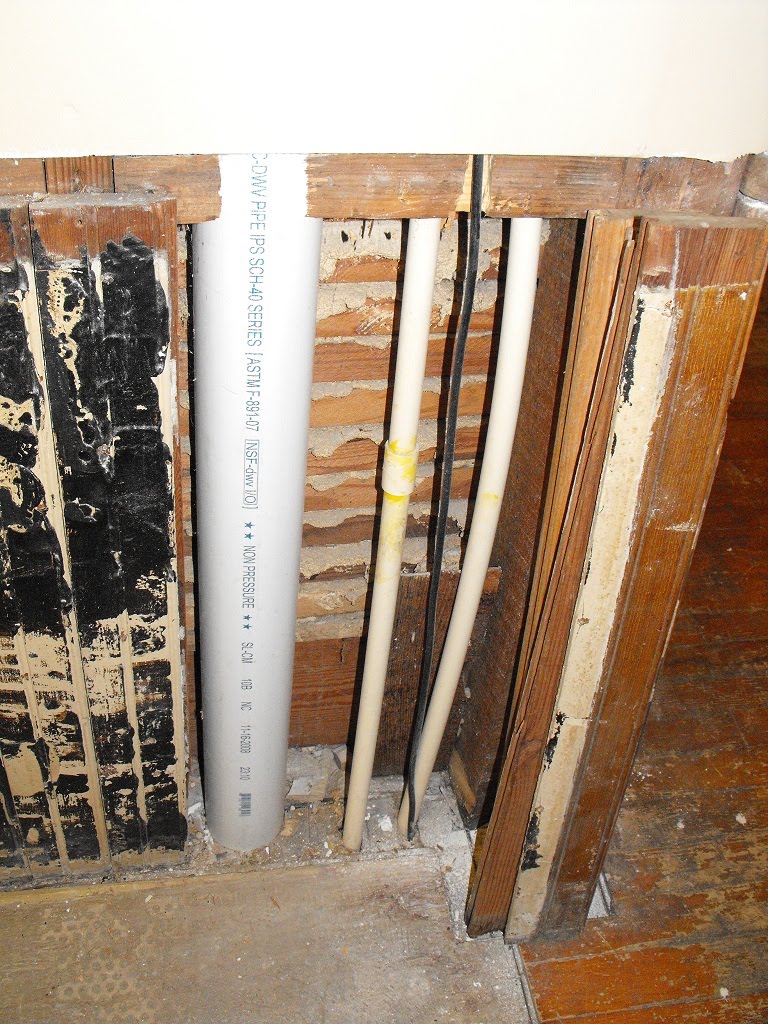
You can also see the missing boards to the right. These were removed to run the plumbing, electrical, cable, and the vacuum line.
The 3" drain pipe sticks out slightly from the wall so I couldn't just slap a board over it.
I had to remove some material from the back of the piece of beadboard for it to sit flush. I did this with a table saw.
Here are the boards test fitted into place:
The last board will need to be ripped to fit. I am not going to install the 3 boards that cover the vacuum line yet because I still need to tie it in under the house so I want to leave it open for easy access.
With all that done I got to work removing the tar. I started by using a heat gun but the tar just got very gooey and was making a worse mess. The best method I found for removing it was to use a very sharp scraper. I had to re-sharpen the scraper every 5 minutes or so but it worked pretty good.
Notice the outline on the wall? Looks like there was a large radiator here before it was converted to a bathroom.
Once all the tar was removed I sanded the boards smooth and then primered and painted them.
Next I need to get the chair rail and picture rail made. I also need to buy the oak T&G flooring, I am going to pull up the existing flooring all the way up to the edge of the main hall and then lay the new flooring down.. Before I do that though I need to fix the sub-floor just to the left of the bathroom door. The toilet sat here so it's in pretty bad shape.
You can also see the missing boards to the right. These were removed to run the plumbing, electrical, cable, and the vacuum line.
The 3" drain pipe sticks out slightly from the wall so I couldn't just slap a board over it.
I had to remove some material from the back of the piece of beadboard for it to sit flush. I did this with a table saw.
Here are the boards test fitted into place:
The last board will need to be ripped to fit. I am not going to install the 3 boards that cover the vacuum line yet because I still need to tie it in under the house so I want to leave it open for easy access.
With all that done I got to work removing the tar. I started by using a heat gun but the tar just got very gooey and was making a worse mess. The best method I found for removing it was to use a very sharp scraper. I had to re-sharpen the scraper every 5 minutes or so but it worked pretty good.
Notice the outline on the wall? Looks like there was a large radiator here before it was converted to a bathroom.
Once all the tar was removed I sanded the boards smooth and then primered and painted them.
Next I need to get the chair rail and picture rail made. I also need to buy the oak T&G flooring, I am going to pull up the existing flooring all the way up to the edge of the main hall and then lay the new flooring down.. Before I do that though I need to fix the sub-floor just to the left of the bathroom door. The toilet sat here so it's in pretty bad shape.
Saturday, July 31, 2010
Parlor
The Parlor is the next room I've started on. All of the wallpaper and trim is stained yellow from what appears to be years of cigarette or cigar smoke. A few weeks ago I started scrubbing the wallpaper and it looks like I will be able to get it clean enough to save.
I'm using bleach and a scrub pad. I still have about half the room to go.
I went ahead and prepped and painted all the trim over the last few days. I dont have a good before picture of the ceiling but here it is after I scrapped all the loose paint off:
And here it is after painting:
All the trim is now complete. I still need to scrape the paint off the windows and a few areas need some caulking.
I pulled the fireplace mantle off the wall because I intend to strip it down and refinish it. In pulling it off I've discovered that the mantle is oak. The mantle is just leaning on the wall for now:
I also found a piece of original hearth and surround tile:
The red brick looking tile was installed sometime in the 40's when the oak floors were done. The floor was laid over the original pine floor so the brick tiles were just put over the original green glazed subway tiles to bring the hearth up to the same level as the oak floor. I am going to tear up the red tile then carefully remove the original tile then lay down a new mud bed then reinstall the original tile. I need to find some salvaged green tile for the surround though since that was removed.
I'm using bleach and a scrub pad. I still have about half the room to go.
I went ahead and prepped and painted all the trim over the last few days. I dont have a good before picture of the ceiling but here it is after I scrapped all the loose paint off:
And here it is after painting:
All the trim is now complete. I still need to scrape the paint off the windows and a few areas need some caulking.
I pulled the fireplace mantle off the wall because I intend to strip it down and refinish it. In pulling it off I've discovered that the mantle is oak. The mantle is just leaning on the wall for now:
I also found a piece of original hearth and surround tile:
The red brick looking tile was installed sometime in the 40's when the oak floors were done. The floor was laid over the original pine floor so the brick tiles were just put over the original green glazed subway tiles to bring the hearth up to the same level as the oak floor. I am going to tear up the red tile then carefully remove the original tile then lay down a new mud bed then reinstall the original tile. I need to find some salvaged green tile for the surround though since that was removed.
Labels:
flooring,
house history,
Paint,
parlor,
Wallpaper
Subscribe to:
Posts (Atom)