Showing posts with label Demo. Show all posts

Monday, October 27, 2014

Sunroom Exterior Walls

A real, actual post! Yes, I know it's been ages. I stopped working on the house a few years ago because I accepted a new position at work that requires me to travel a lot. Oh, and we've also had 3 kids in 4 years. I am now in between projects that require travel so I figured that now is a good time to get back to work on the house and try to finish it up.

The project I chose to start on is the exterior of the sunroom. I never finished the exterior walls when I built the sunroom, a combination of white pine trim boards with no paint, only primer on some of them, and a major design flaw, caused a lot of rot.

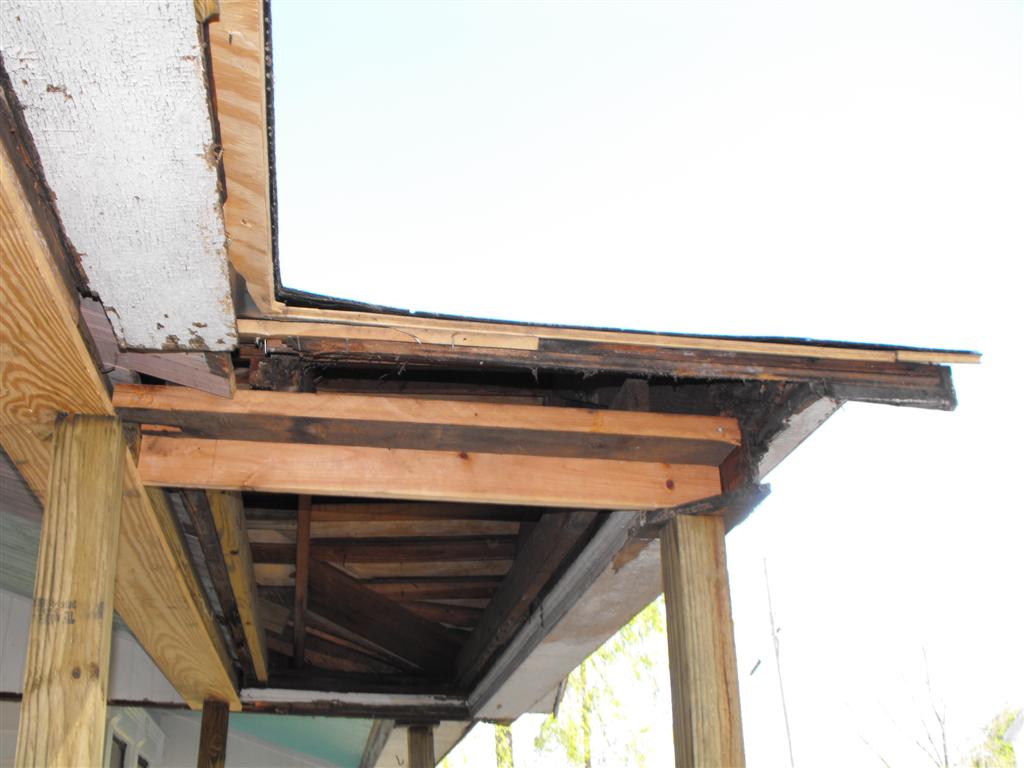
The bottom exterior trim board ended up sandwiched in with the deck ledger board, creating a pocket to hold, moisture and leaves.


The area circled is where the moisture and leaves would collect. You can see all the rot.

I removed all the rotted boards and put up new plywood.


This time around I decided to use siding instead of paneling. I added siding to the bottom and top areas, and installed new trim boards where they were needed. There is now a small gap between the siding and the edge of the deck for water to shed off.


I then caulked all the seams and began primering the trim.


Most of the trim has been primered. Tomorrow I will finish primering the trim and the siding and then I can paint everything to match the house.

I will tackle the windows at a later time. I will have to remove one at a time, strip them down completely, primer, paint, reinstall glass and glaze. Not really looking forward to that part.

Monday, October 18, 2010

Side Hall Floor

This is a big project that I have been needing to get done for a while. Especially now that it's getting cold out. The cold air comes up through all the holes in the floor so this project had to get done.

As I've mentioned before the side hall was converted into a bathroom in 1928, last year I tore the wall down and turned it back into a side hall.

The Red Oak flooring on the first floor was installed over the original floor sometime in the 40's so the side hall didnt get done since it was a bathroom at the time.

I started by tearing up the plywood.


and found linoleum underneath.


I pulled that up and the original flooring under that was pretty rotted, which I had expected, so I pulled that up.


Of course most of the floor joists were rotted and hacked up and patched so I tore out the rotted ones and installed new ones. I used 2x8s ripped to a full 6" to match.


I took this opportunity to do a few other things under the house that needed to get done. I dug out a large area under the ducting so I could have access to underneath the bathroom, I ran some electrical from the bathroom, and I removed the 2 return vents that the moron HVAC guys had put in. They will be relocated to the dining room.


After that I put the sub-floor in with old 1x boards that I had.


Then I pulled up the old red oak flooring on the other side of the hall.


Then laid down felt paper.


Then I began the flooring. For the door sills that go to the bathroom and the sunroom I used 5" wide oak flooring. I kept the tongue on the sill so I could lock the flooring into it since it has grooves on the sides.


Here are some shots of the progress.


I still have a little strip along the wall to finish up. Not sure yet when I will be able to sand and finish it.

Tuesday, October 12, 2010

Dining Room Door

In our dining room there are some shelves in what used to be a window, that was originally a door. I've been using it to store tools, nails, and other miscellaneous junk.


I thought about returning it to a window but to do that I would want to make it the same size as the rest of the windows in the house. This would require tearing out a large portion of the wall and a lot of re-framing.

So I decided to go back to a door instead. This would require a lot less work and it would return it to the way it was originally, I'm a big fan of returning things back to their original state whenever possible.

I started by removing all the tools and junk, then I removed the shelves and casing.


Next I removed the window framing.


Then I installed a sill, built the door casing, cut the door to the proper size, mortised the door and the jam for the hinges, and hung the door.


I still have a lot left to do, I need to install the inner door casing, plinth blocks, and rosettes, trim, install glass in the missing panes, install a door knob and lock, and caulk, primer and paint everything.

Monday, September 13, 2010

Chickens! ...and a workshop

I've been working on two big projects over the last 5 days or so. The first is a chicken coop. We've decided that we want to try raising chickens, mostly for the eggs.

We decided to put the coop next to the barn.


The overgrown area to the left of the barn is the spot.

I completely cleared out the area and then built the coop. I dont have any during pictues but it's basically built out of pressure-treated 2x4's for the framing, chicken wire for the sides, and tin for half of the roof and plastic fencing for the other half.


The area beyond the coop and to the left of the barn will be closed in for another coop soon.

The chickens we are concentrating on are Black Copper Marans, they have very dark, reddish brown eggs that are supposed to be highly prized for their excellent taste. Here is our Marens rooster.


We also have some Dominickers, Cochins, and a few Silkies.

The other project I began working on is a workshop. I really need a place to work and to put all my tools.

The shed behind the kitchen is nice but at 11x11 it's too small.


What I decided to do it tear down the lean-to on the back side of it and add on to the main structure. I will be adding on another 11'. So it will be 22x11. The 11 is a bit smaller that I'd like but I think it will be ok.


The lean-to was so rotted that it only took about 15 minutes to completely tear down by hand. It took longer to haul away the debris.


I pulled up the old blocks to reuse for the new foundation. I had to use a few new blocks.


Next, I pulled the bottom piece of tin off the wall to install the ledger board.


Then I setup the rest of the framing for the joists.


That was as far as I got last night. I was three joists short anyways. I will get them on the way home from work today and also the flooring, I will be using 2x12's just like in the original portion of the shed.

Monday, August 2, 2010

Side Hall

This weekend I worked on the side hall. Here is a pic of how the hall looked last year:


I knew I wasn't going to finish it on my own so I hired on someone to help me. We took down all the plaster and lathe, then put up a few 2x4 studs in the corners, then put up sheetrock, then tape and mud.

Here it is after this weekend:


The small gap between the sheetrock and the wainscotting is for the chair rail that I need to have cut. I'll sand today and put up one more coat of mud. Then I can do the final sanding, primer, then paint.

Monday, April 12, 2010

Stripping the columns Pt. 1

I cut the curved section of the floor boards the other day but I didnt get any pictures of how I did it. I went back and forth on how to measure to get the perfect cut. The floor boards need to be 2 1/4" out from the joists, 1 1/2" for overhang and 3/4" for the facia board I will be installing over the joists. Because the joist is on a curve and the floor boards are straight you cant simply measure the distance out from underneath and subtract 2 1/4".


I toyed with a lot of ideas, all of them very complex but in the end what I came up with was very simple and worked perfectly. What I did was take an 8 ft section of quarter round and clamp it first on one end just before where the porch starts curving, 2 1/4" out, then bent the quarter round all the way around to the other side. I checked the measurement in the center of the curve to make sure it was 2 1/4" out from the joists. Then I traced the curve with a pencil to make my cut line.

Then it was just a matter of making the cut with my jig saw.


I still have a few small floor pieces I need to glue and nail at the center.

Next I turned my attention to the boxed beam in the gable section. Most of it was rotted and needed to be replaced. I took out the old beam and started installing the wood for the new one.


With that finished I could begin working on the columns.


I'm hand scraping for the most part. Stubborn areas get the heat gun.

Here is the upper section of the first column scraped.


The capitols are in really bad shape, they are covered with tons of layers of paint so I'm going to completely dismantle each one to strip the paint.


Once it was completely dismantled (didnt get a final dismantled picture) I started scraping each piece. I had to use the heat gun for most of it.
Here is one section stripped of paint and put back together.


This was as far as I got last night. Stripping all the columns is going to be a long, painstaking process but in the end it will be worth it.